Showing posts with label homemade. Show all posts

Tuesday, January 25, 2011

Next Project to Try: Homemade throw pillows

Last weekend online I came across a fun and easy set of pillows for Valentines Day. I cannot, for the life of me, find them again. I need to get better about bookmarking stuff. Anyway, once I finish my gift for my almost 3 year old Rosalie, I will get started on Valentine's felt pillows. Here's some ideas for me to think about before starting.
Felt letters on a pink pillow.  Simple, yet cute.
Totally making one for Audrey’s room.
(via hypnotizedmor)


I also want to add homemade tags to the pillows. GwennyPenny.com has an amazing tutorial on how to make them. The directions are so simple that I'm sure that even my non-sewing self could get it figured out.

Saturday, November 20, 2010

Halo Donut Cake Pops

I'll be gone for a women's retreat, so hubby is hosting a Halo guys night. Three TVs set up with three XBOXs in one house so 12 guys can play simultaneously. What can I say?... I'm madly in love with a geek! Truthfully, my Martha Stewart geekiness is just as out of control, so I've decided to make cake pops for the boys. The donut version of cake pops is much easier than the cake version or the oreo version. Oreo cake pops still get the number one vote in taste. Note to self, next time try Krispy Kreme donut holes. King Soopers doesn't cut it for taste, but I refuse to give up on donut holes. Donut holes stay together, unlike cake pops, and donut holes are light and won't fall off the stick when dipping, unlike cake pops. It cut the time needed for this project in half, not even including the extra time needed to bake and cool the cake if you make it from scratch.
Supplies: donut holes, microwavable chocolate, lollipop sticks, foam blocks found in floral section of a craft store, small candy bags to wrap the finished product in.
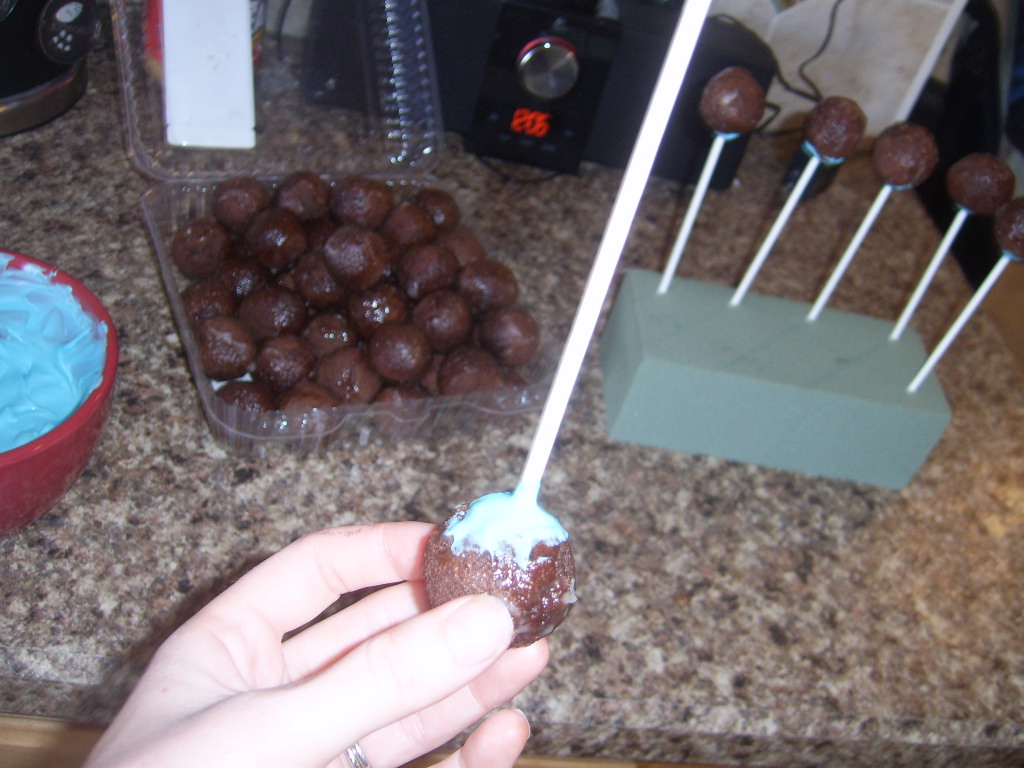
Dip one end of the lollipop stick in melted chocolate.
Shove stick 1/2 way through donut hole. The melted chocolate on the end of the stick should act as glue.

Repeat with all donut holes, and let them cool right side up in foam blocks.
Dip entire donut hole in melted chocolate. Gently tap the stick on the side of the bowl to get extra chocolate off.
Let dipped doughnut holes cool right side up stuck in foam blocks. Add piping after the chocolate is hardened. I used Wilton black icing for the halo symbol, but melted chocolate in another color would be more stable.

Saturday, September 18, 2010

Happy Face Oreo Crunch Pops

I saw these cake pops on Bakerella's site and had to try them. The oreo chocolate crunch ball recipe (Thank you to Nichole's mom Theresa) tasted head over heels better than the cake filled pops though. Plus they were a bit more forgiving when it came time to dip. The cake balls were falling off the sticks like crazy. I used mint oreo cookies instead of the called for regular oreos. They tasted like Thin Mints! 
‎1 pkg mint oreo cookies
1 can cream cheese frosting (original recipe calls for 8oz pkg of cream cheese which tastes even better but you can’t safely keep them at room temp.)
1 pkg yellow melting candy chocolate
Crush oreos and mix with frosting. Form into balls. Dip lollipop stick into melted chocolate and insert into each oreo ball. Refrigerate for a few min to firm up. Dip each ball in yellow melted chocolate and let harden at room temp. Shove the sticks in a block of Styrofoam to keep upright. After dried either pipe faces on with melted dark chocolate or draw on with edible ink. If you refrigerate or freeze these, they will dew when they come back to room temp. Yum!My favorite creative technique today is spacing the eyes way farther than you would expect, and a small mouth placed close underneath. Very Japanese-ish :)


Sunday, September 12, 2010

Kid Craft Backpack Keychains

      Jimmy (almost 9) decided that he wanted 100 keychains jingling on his backpack this school year. He’s starting with 3. :) I went to Hobby Lobby and bought a large pack of key chain rings for about $4. Hobby Lobby’s 40% off coupon would be great to use on this purchase, because I don’t ever really see the kids crafting supplies on sale.
       Since we recently used this technique to make dog toys, we started with Scoubidou keychains, also called scoobies, boondoggle, gimps or lanyards. Pinky now has a square stitch keychain; Jimmy now has a circle stitch keychain. We added letter beads to put their nicknames onto the keychains.
       We are now hooked on using perler beads to make keychains. The kids build their design on boards then get to carefully iron their creation. Don’t forget to cover your creation with parchment paper before ironing it or else goodbye iron. Remove one bead from inside the design to have a hole ready for your keychain. Let the design cool completely before putting the keychain on to keep it as strong as possible. I also printed off a bunch of patterns. Pinky was meticulous in following the ones that she liked, while Jimmy preferred to get ideas from the patterns and change it. Here, here, and here are some more pattern links.

Sunday, September 5, 2010

Scrap Fabric Dog Toys

Introducing my afternoon nanny family: Pinky(age 7) and Jimmy(age almost 9). Fake names of course. Jimmy and Pinky recently got a puppy, so for our craft we made dog toys out of some the scrap fabric laying around.


Use 3 strips of fabric, tie a knot, and braid.


OR Use 2 or more strips of fabric and keep tieing knots

OR Do you remember using flat plastic string in a weaving pattern to make key chains? Use 2 or 4 strips of very long fabric and weave to make a beautiful durable dog toy.
This last one reminds me of Mary Engelbreit


I got a pack of bells from Hobby Lobby, and we tied a bell on one end of a couple of the dog toys. The bell toys should be given under supervision in case your puppy gets the urge to take apart and eat the bell. The bells in the Christmas craft section were cheaper than those in the regular craft section. SAVINGS ALERT: just after Christmas stock up on "Christmas" bells for really cheap to use throughout the year. great for sewing into dog toys and baby toys.

Friday, September 3, 2010

Vinyl Wall Lettering Using Cricut

I’ve officially been living in my first house for one year… I’m only just starting to get stuff up on the walls. Poop. Oh well, at least I’ve had a chance to get the Cricut out.

Materials:
Scrap paper
Vinyl sheets
Cricut machine
Masking tape
Level

Directions:
Using your level and masking tape, make a line across the wall where you will want your phrase. This will ensure that your phrase isn’t forever lopsided. Place one extra piece of tape exactly where you want your phrase to be centered. Using scrap paper, cut out the words or pictures that you want on the wall. Use masking tape to fix your design on the wall. Remove and re-stick your design if it’s not centered on your line. Step back and see if you like what you have. If you want to adjust size or change the entire thing, re-cut from scrap paper using the Cricut. Once you have a design you love, I’d recommend writing down you sizes and leaving it up for a couple of days. After the “let’s not be drastic” waiting period, if you still love the design, use the Cricut to cut the same design out of vinyl this time. Take one paper piece off, wipe that part of the wall clean with a damp rag, dry the wall very well, and place one vinyl piece in place of the paper one. Continue until your entire phrase is on the wall. Whenever you have outgrown your unique design, a hairdryer will take it right off. Voila!

My favorite creative technique today is using lowercase letters as uppercase letters. Simply choose a bigger size font for the letters you want "capitalized". i love crafting with my cricut!

Tuesday, August 31, 2010

Guitar Pick Wine Charms

After making the wine box for a friend’s birthday, I decided it was time to try my hand at wine charms. At Hobby Lobby I found a package of 10 guitar picks, with holes, in the charm section. I also found a package of 8 leaves, that looked just like grape leaves. Every few weeks, all of the charms are 50% off at hobby lobby, so keep your eyes open for deals on this craft.


Materials:
20 gauge wire
Wire cutters
Needle-nose pliers
Seed Beads
Charms (1 charm per wine charm)
Jump rings
Directions:
Attach a jump ring to your charm if it does not already have something to dangle from. Cut a 7inch piece of wire. Create a swirl on one end of your wire, using needle nose pliers, big enough that the beads and charm will not fall off. Bead your wire with your charm in the middle leaving about an inch and a half of wire. Create a swirl on the other end of your wire big enough that the beads and charm will not fall off. Bend your creation in to a circle. Repeat these steps for as many wine charms as you wish to make. Voila!
If the charms you are using in a set are all the same, you should use a different color of bead on each charm. Example: One charm with all green beads, another charm with all blue beads. The color of bead will be the distinguishing factor between glasses of wine. If the charms are all different within a set (such as the guitar picks each being different) you could choose to make all of the beads the same color, or even choose to not use beads at all.
Don’t forget pretty packaging. I used candy wrapping plastic bags that I found at Michaels. Cut short, folded over, and stapled on some scrapbooking paper as a sort of label. These small labels were a great way to use up some of my pretty scrap paper. My favorite technique for embellishing today is chalking with ink and a cosmetic sponge, which I used on my labels.